Showing posts with label hand made. Show all posts

Wednesday, March 11, 2015

How to Make a Pom Pom Blue Tit


Pom Pom Blue Tit


Proportions for wool colours
You will need...
3.5cm and 4.5cm pompom makers
White, black, blue, green and yellow wool
Blue, green, beige and pink felt
Pipecleaner in grey, black or white
25cm fine 3mm ribbon for hanging
25cm 12mm ribbon for the bow
Tiny mini pom pom or a little circle of white felt
Two 'holes' punched out of black card with a hole punch, for the eyes
Glue - UHU craft glue is great, but not the water based one
A bodkin or tapestry needle

Head pom pom
Head
On the 3.5cm pompom maker use the black, white and blue wool and wind it round in the proportions shown in the diagram. When it's really fat and full, snip around the edges with sharp scissors, and tie the pompom off firmly with the blue wool. Leave long strands of the tie-off wool at least 20cm long. These will be used later to attach the head to the body

Head pom pom with body on maker
Body
On the 4.5cm maker, wind the yellow and green wool as shown in the diagram. It's about 45% yellow, 55% green. When full, carefully snip around the edges with small sharp scissors. Tie the pom pom off, but don't take if off the maker just yet...


Body pom pom snipped open
Joining the head to the body
Using the long tail threads on the head, wrap them twice around the body pom pom while it's still on the maker. Tie the threads very tight, making sure that the head is securely tied to the body. Remove the body from the pom pom maker, and trim to shape. You can make it more bird-like if there is enough wool.

Attach head to body while still on maker
Head and body released from maker
Trimmed bird

Add legs and cut out felt pieces
Features
Part the wool at the bottom of the bird and wiggle the pipecleaner through underneath the tie-off wool. Make sure both legs are even in length and then shape them with a few bends. Cut out two wing shapes and a tail from dark blue felt. Cut a beak from beige felt, and a blossom flower in pinks with some green leaves. The eyes can be made using a hole punch, taking two of the small circles and colouring them with felt tip pens.

Glue the felt features in place
Finishing Off
Thread the fine ribbon onto a bodkin or tapestry needs, and post it underneath the tie-off wool of the body, just behind the head at the base of the neck. Tie it off with a small knot and trim the ends in a V or slant. Glue the felt features on with UHU craft glue. Lastly, use the wider ribbon to tie a bow on itself, then glue that at the base of the hanging ribbon on the bird's back.

Add a final bow on the back, and the two eyes
I first posted this as a 'Twitorial' on 9th March, but the instructions required a little more space, so here it is in full. One reason I've not used this blog for a while is that I cannot abide the new Blogger interface. I find it impossible to position pictures easily. My posts contain a lot of images so this has become very frustrating for me. Please excuse the erratic spacing and hopeless layout!

Enjoy!

Saturday, February 01, 2014

Blue String Soup - for Bears

Blue Bear (Pussman & Co pattern), 2014
I made this little fellow with a pattern from Pussman & Co Bears, from a piece of discontinued blue on yellow mohair. The pattern is available on her Etsy shop.  He's only small, about 7" tall and has black glass eyes and cotter pin joints. I usually use the plastic snap type safety joints but these have been harder to get hold of recently in a decent quality so I've tried cotter pins out on this chap before I use them in my dogs. I love his big head, small body and pointy nose! I'm a big fan of her bears now and hoping to meet her (and her bears) at the Winter Bearfest in Kensington Town Hall on the 23rd February. It's a great place to see what everyone is making, and to pick up lots of fur bargains and little bits and pieces from the supplies shops. It's quite eccentric though, a huge hall full of teddy bear enthusiasts, but something one should see at least once in one's life ;-)

Brockley Christmas Market, 2013

Brockley Christmas Market 2013, cold and very windy!

Croftmas Fair with my keen assistant! 2013
I did quite a few fairs and events over Christmas, which was good fun and I was glad to sell a Fox Terrier and lots of little cards and pegdolls, and walnut shell mice too. It's a good opportunity to meet people and to see what they choose, which helps me work out what to make more of. I had some very nice conversations with people about my work which is very encouraging as I spend a lot of time working alone with no feedback.

Dachshund Little Toy Dog, 2014
Finally, I've reworked my pattern for the Dachshund and he's looking a lot more realistic now. I started out using the same basic pattern for my early dogs and have now got the hang of making quite drastic adaptations to it to make the different shapes required by different breeds. Next up is a revamped Lurcher, a possible Jack Russell review and new patterns for a Shetland Sheepdog and a Miniature Schnauzer.


Saturday, February 16, 2013

Whippet Toy Dog


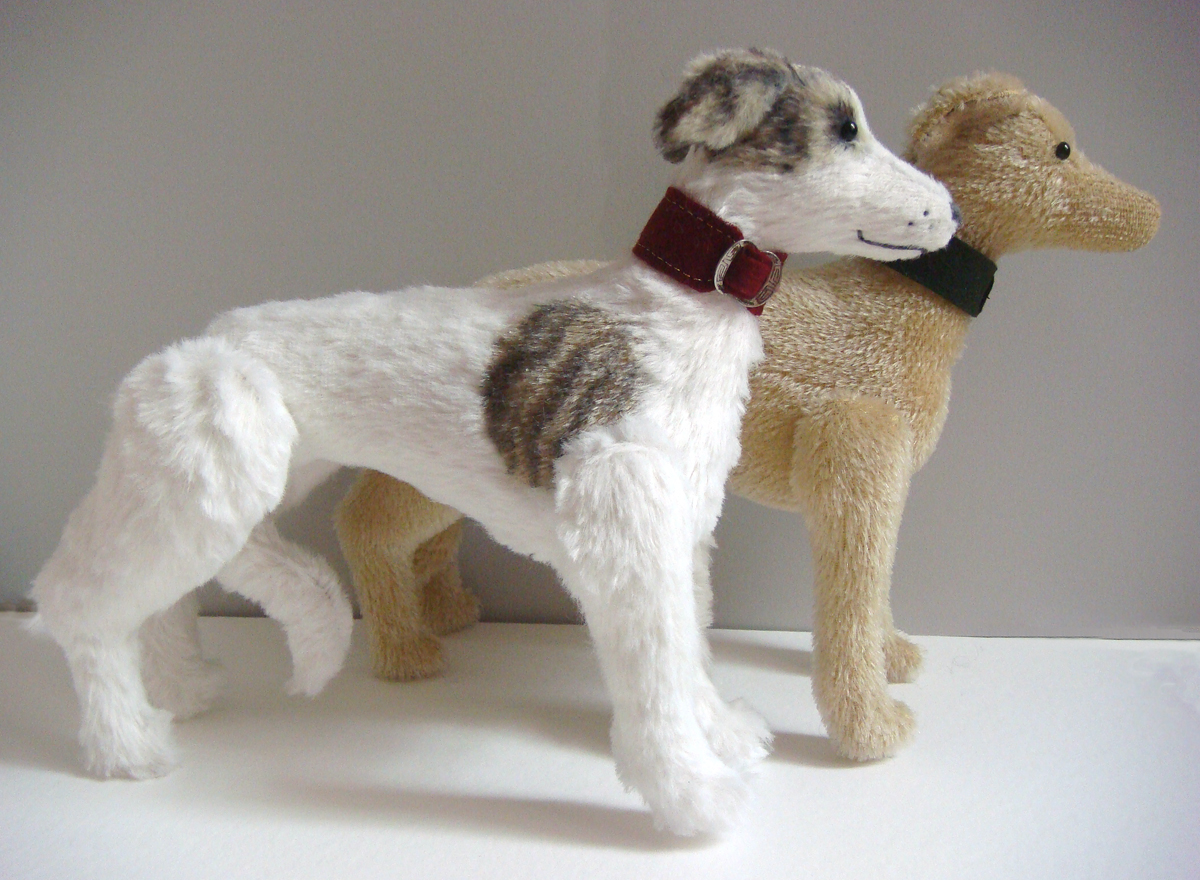
I've been making a new dog pattern this month. I've wanted to make a whippet for a while but have been held back while looking for the right kind of fur. They are so sleek and smooth that even the shorter pile mohair is too tufty for them. I found this white velboa which has a woven backing and it's perfect. It takes colour well from fabric pens too so it's very suitable for the hand-drawn markings. The spots on the body are set-in by hand and cut from the 3mm mohair, shown here on the fawn dog in progress at the back. He has no nose at the moment (cue well known dog joke). The eye patches and ears are coloured with fabric pens. I'm quite pleased with how the ears came out. They need to be folded back against the head in a sleek streamlined way.

Whippet toy dogs, (fawn shown in progress).

I've had to change a few components too since making the earlier dogs. The quality of the plastic toy joints has gone downhill dramatically. I have heard that the tsunami in Japan destroyed the businesses which produced them and whole factories and production lines just disappeared. The joints I managed to source did not have washers, and had to be cleaned up and trimmed by hand with a craft knife as they were poorly cast. I've decided to swap to using the old fashioned cotter pin joints from now on. These are good as they are readily available in a wide range of sizes. I've had a similar problem with the black plastic eyes, so have changed those for the black glass eyes with metal loops on the back. These are better for creating expressions as you can recess the eyes by pulling the threads and securing them at the back of the head.
 
Whippet parts in progress showing set-in body patches.
Finished patch with brindle markings.
It's quite time-consuming sewing the smaller pieces in by hand, but impossible to do such fiddly things on a machine. I use my old Bernina record machine which is fantastic and it copes with most intricate work, but some pieces just have to be eased in stitch by stitch.


The collar is made of a dark red wool felt, with an old silver buckle which has been lurking in my button tin for years. I've embroidered gold thread around the edges by hand. I might add some more decoration before it's finished.


I'm planning on making the fawn dog brindled when I can pluck up the courage to set about him with the fabric pens. He also needs a nose and a decorative collar. These two have different tail positions. The white dog's tail is tucked between his legs while the brindle's is lifted a little. Whippets generally tuck their tails in, but I think the pattern looks better if it's held out a bit.


Update: I finished the fawn brindled dog. I gave him a silver and green collar with mother of pearl button.

Wednesday, July 04, 2012

Blythe Hill Festival - this weekend

Hi, well we've spent a year with no electricity (!) which has been frustrating and fun in equal measure. Son has learned not to take it for granted, which is a good lesson in life. I keep stepping over imaginary extension leads and looking like I've lost my mind. But things are now fully repaired and working... sewing machines, computers woo hoo! If you need an electrician I can wholeheartedly recommend Tim Guthrie in Brockley.

So, I am taking my stall to Blythe Hill Festival this weekend Sat 7th July 11-4pm. Do come along, it's a lovely festival on a very high hill in South London with incredible views. Now we have the 'overground' tube line there's no excuse. And there will be donkeys.


The Little Toy Dogs are going along nicely and can be found at www.littletoydog.co.uk
I've just added some felt bowls and as soon as this weekend is over I'll make some coats and beds. I've been making them to order and never getting any spare for the shop so I've had to do two things: just say that I'm making them to order in the shop, and put the price up!

Three of us had a really successful Artists' Open House in May at my friend Kath's house on Lowther Hill. She is a jeweller, and her folksy shop is HERE...  Sarah McEvoy makes cards, prints, bags and more and you can find her at Under The Eaves.

Hope to see you at the weekend, and back on the blog shortly. We've got tickets to Tindersticks on 15th July at Somerset House so hopefully some Drawing in the Dark to come soon as well.


Sunday, June 19, 2011

Toy Dachshund

Toy Dachshund by Alice Wood
Toy Dachshund, a photo by Alice Wood on Flickr.

I've managed to make up the Dachshund pattern. I elongated the body, shortened and widened the legs and made the ears a different shape. This one is black with brown details, but I'm going to make one up in plain brown too. I just need to order some nice fur. I'm a bit low on all materials actually and the fur is rather expensive. Materials cost per dog is high and the making time is fairly lengthy because it's quite involved with a fair bit of hand sewing. I think I will go for Spaniels next, and find some nice fur for Retrievers and Labradors.

Wednesday, June 15, 2011

A New Woofer

I've finished a new dog. He's a sort of tufty black critter with a white bib. I think he's probably of mixed heritage! Have been trying out new ear positions. It's amazing how they all come out different from exactly the same pieces of pattern. It all depends on the way the mohair falls, or sticks up! Dachshund pattern is finished with one black and brown dog cut out and ready to sew. I hope to have one ready very soon.