Tuesday, February 23, 2016

Find Me On Instagram


Life is busy at the moment. This blog is a bit neglected. I have found the best way to play, chat and keep in contact with everyone, and the easiest way for me to show what I'm up to in the studio is to use Instagram.

I've got an account for my illustration and personal stuff (there are dog photos - be warned!) @alicewood and also one for my toy company Little Toy Dogs @littletoydogs. Please follow me there, if you like!

I've been illustrating a new series of books for the charity Shine UK about Bella Bear, who is a little bear living life with spina bifida. I'll be doing more work on this project in 2016.

Little Toy Dogs now have their own website www.littletoydog.co.uk. In 2016 I was selected to become a member of the British Toy Makers Guild, which I am thrilled about.

Silken Windhound Little Toy Dog, 2016

Monday, July 13, 2015

Little Toy Dog Brooches

Little Toy Dog Brooches: postcard

I've been busy making lots of new brooches for the Little Toy Dog Company and I've just finished a  new postcard design, which is always exciting! Can't wait to get that back from the printer. I posted a Samoyed off to the US recently and a Scottie dog off to Australia. My doggies are certainly getting around. I'll be showing at the Blackheath Christmas Fair later in the year, along with Brockley Christmas Market too.

In the meantime I'm starting some new illustrations, with the aim of replacing my portfolio and revamping my website, which I've been tidying up on over the last few days. Before I can do that I have to clear up my studio space, which is completely overcrowded. I cannot find anything and I can't move a single pencil without starting an avalanche of books, paper, brushes and bird's nests! I have filled a recycling bin and now have to wait for it to get emptied before I can carry on. Wish me luck and I will post some new work as it appears (and if I like it!).

Samoyed brooch, Little Toy Dog Company

Wednesday, March 11, 2015

How to Make a Pom Pom Blue Tit


Pom Pom Blue Tit


Proportions for wool colours
You will need...
3.5cm and 4.5cm pompom makers
White, black, blue, green and yellow wool
Blue, green, beige and pink felt
Pipecleaner in grey, black or white
25cm fine 3mm ribbon for hanging
25cm 12mm ribbon for the bow
Tiny mini pom pom or a little circle of white felt
Two 'holes' punched out of black card with a hole punch, for the eyes
Glue - UHU craft glue is great, but not the water based one
A bodkin or tapestry needle

Head pom pom
Head
On the 3.5cm pompom maker use the black, white and blue wool and wind it round in the proportions shown in the diagram. When it's really fat and full, snip around the edges with sharp scissors, and tie the pompom off firmly with the blue wool. Leave long strands of the tie-off wool at least 20cm long. These will be used later to attach the head to the body

Head pom pom with body on maker
Body
On the 4.5cm maker, wind the yellow and green wool as shown in the diagram. It's about 45% yellow, 55% green. When full, carefully snip around the edges with small sharp scissors. Tie the pom pom off, but don't take if off the maker just yet...


Body pom pom snipped open
Joining the head to the body
Using the long tail threads on the head, wrap them twice around the body pom pom while it's still on the maker. Tie the threads very tight, making sure that the head is securely tied to the body. Remove the body from the pom pom maker, and trim to shape. You can make it more bird-like if there is enough wool.

Attach head to body while still on maker
Head and body released from maker
Trimmed bird

Add legs and cut out felt pieces
Features
Part the wool at the bottom of the bird and wiggle the pipecleaner through underneath the tie-off wool. Make sure both legs are even in length and then shape them with a few bends. Cut out two wing shapes and a tail from dark blue felt. Cut a beak from beige felt, and a blossom flower in pinks with some green leaves. The eyes can be made using a hole punch, taking two of the small circles and colouring them with felt tip pens.

Glue the felt features in place
Finishing Off
Thread the fine ribbon onto a bodkin or tapestry needs, and post it underneath the tie-off wool of the body, just behind the head at the base of the neck. Tie it off with a small knot and trim the ends in a V or slant. Glue the felt features on with UHU craft glue. Lastly, use the wider ribbon to tie a bow on itself, then glue that at the base of the hanging ribbon on the bird's back.

Add a final bow on the back, and the two eyes
I first posted this as a 'Twitorial' on 9th March, but the instructions required a little more space, so here it is in full. One reason I've not used this blog for a while is that I cannot abide the new Blogger interface. I find it impossible to position pictures easily. My posts contain a lot of images so this has become very frustrating for me. Please excuse the erratic spacing and hopeless layout!

Enjoy!

Saturday, February 01, 2014

Blue String Soup - for Bears

Blue Bear (Pussman & Co pattern), 2014
I made this little fellow with a pattern from Pussman & Co Bears, from a piece of discontinued blue on yellow mohair. The pattern is available on her Etsy shop.  He's only small, about 7" tall and has black glass eyes and cotter pin joints. I usually use the plastic snap type safety joints but these have been harder to get hold of recently in a decent quality so I've tried cotter pins out on this chap before I use them in my dogs. I love his big head, small body and pointy nose! I'm a big fan of her bears now and hoping to meet her (and her bears) at the Winter Bearfest in Kensington Town Hall on the 23rd February. It's a great place to see what everyone is making, and to pick up lots of fur bargains and little bits and pieces from the supplies shops. It's quite eccentric though, a huge hall full of teddy bear enthusiasts, but something one should see at least once in one's life ;-)

Brockley Christmas Market, 2013

Brockley Christmas Market 2013, cold and very windy!

Croftmas Fair with my keen assistant! 2013
I did quite a few fairs and events over Christmas, which was good fun and I was glad to sell a Fox Terrier and lots of little cards and pegdolls, and walnut shell mice too. It's a good opportunity to meet people and to see what they choose, which helps me work out what to make more of. I had some very nice conversations with people about my work which is very encouraging as I spend a lot of time working alone with no feedback.

Dachshund Little Toy Dog, 2014
Finally, I've reworked my pattern for the Dachshund and he's looking a lot more realistic now. I started out using the same basic pattern for my early dogs and have now got the hang of making quite drastic adaptations to it to make the different shapes required by different breeds. Next up is a revamped Lurcher, a possible Jack Russell review and new patterns for a Shetland Sheepdog and a Miniature Schnauzer.


Thursday, October 31, 2013

... and you will paint for a Year and a Day


Aqua After Hours, 2013, watercolour.

For more than a year I've been working on a design which is going to be applied in specialist vinyl to the night shutters of a hairdressing salon, Aqua, in South London. Parise, the owner, asked me to create a trompe l'oeil painting which showed the interior of the salon, accurate in perspective to the viewer on the street, but in an imaginary magical midnight scene where everyone is getting ready for a fairy tale masked ball. Together we spent a lot of time finding pictures of hairstyles, clothing and references, and I spent even longer trying to get a drawing we were both happy with before I started the painting. She has recently refurbished the salon with very beautiful lighting, and a fabulous London brick wall, and she wanted to keep enough of the real interior to catch the eye of passers by, but make them double take at all the crazy goings on.

I've had to live with the painting around my studio this year, turning it to the wall for short periods to forget what I've already done and then sneaking up on it with a fresh eye to check it's not full of awful mistakes! I've been checking the colours and tones, making sure the light sources are all fairly believable, and generally procrastinating about finishing it. I've become a fan of listening to audio books while I paint, and have caught up with quite a pile of reading. Parise has been brilliant to work with, and has a particularly keen eye. Those little things I knew were wrong but hoped I might get away with were gently noticed and pointed out! All to the good though, and now it's finally finished.

We are in the process of organising the transfer of the design to the shutters, and will be able to post a new photo of the finished shutters before too long.

Wednesday, September 04, 2013

Eddystone Press - Taliesin

Taliesin, paperback 28pp, Eddystone Press 2013.
 

There seems to be a tradition in small press publishing to call your press after the name of the road in which you live, or a tree which grows in your garden. I live in a road that is named after a famous lighthouse situated off Plymouth in the English channel. I’ve always liked lighthouses and it was part of the reason I liked the house. It seemed a good idea, when trying to think of a name to publish small books under, to use Eddystone Press.


Taliesin was created as a one-off artist's book when I was at Camberwell College of Art many years ago. It was small, fragile, illegible and unique! Not the sort of thing you'd image would reproduce well but, at the time, colour xerox machines had just become widely available. I was able to raise the money to have the whole book copied flat onto A3 sheets. I spent several long nights cutting and assembling the pages together and I silkscreened a copyright page in gold ink on blue paper tissue to insert at the back. I made 100 copies, and even had an ISBN assigned to it. I sold them all within a few weeks. I have one sitting on my shelf now, and it still looks good after all this time, although the blue tissue endpapers have faded a little. Colour Xerox was a much more lightfast process than modern inkjet printing.


Taliesin was a 6th century Welsh bard. He was said to have lived in the court of King Arthur, and the legend of his magical birth was written down in the 16th century by Elis Gruffydd, after many generations of oral storytelling. This text came from a lovely vinyl LP called Mother that I listened to often, by Gilli Smyth, a performance poet and a founder and singer with the band Gong. I played it over and over, writing the story down a line at a time. I sent her a copy of the limited edition and received a very nice letter in return all the way from Australia. As a result of this contact I ended up becoming friends with Rob, who ran their merchandising and publicity in the UK. In 1989 I helped run their merchandise stall at Glastonbury Festival, which was a lot of fun! I even got a mention on a later LP sleeve.


I had been working in a very abstract way until I made this book, making collages of randomly found objects. I was a fan of Joseph Cornell, and made many little assemblages in cigar boxes. Although I could draw well in a photorealistic way, I didn't like the way I drew at all. It was figurative and literal, and I had no idea how to take the leap to make it look interesting and characterful. These drawings are my first attempts to introduce abstract shapes into the images alongside human figures. The faces are heavily influenced by a beautiful Picasso drawing I saw in a museum in Paris. I was so taken with it that I drew it on the spot, and made my own versions of it over and over. It has the high brow, straight, thin nose and small mouth of some Renaissance sculptures, but knowing now how influenced Picasso was by African and Neolithic art I can see that it appealed to me on many levels, and held references to much older conventions of human representation.

To make it into a modern paperback that fits the format of the available options for self-publishing I've placed all the double page spreads on the right hand side, and transcribed the text (which was hand written) on the left. It's typeset in P22 Koch Nueland, a digital font created from the work of the German typographic artist Rudolf Koch whose Book of Signs was also a source of inspiration.
 
Taliesin, artist's book, 1990.
I've always really loved this little book. It has such a spirit of the time I made it, and it was the first time I'd paginated a text, and worked through all the problems of matching illustrations to the storytelling, and keeping the pace alive. These are still problems I deal with in every story I illustrate, but it was here that I first attempted it. For Eddystone Press it's a good place to start: at the beginning of my adventure with books.

If you like, you can order a copy here for £6.99

Sunday, August 11, 2013

Print Swap

Scary Stories, Linoprint, h21cm x w29.7cm, 2013

Today I finished the linoprint I started at Holland House on the SCWBI retreat. I'm quite pleased with how it turned out, after two attempts at the yellow plate! On the first attempt I made the mistake of thinking that the yellow was the lightest colour, not realising that, of course, the yellow is actually darker in tone than the white paper. It was all wrong, so I had to redo it. The second time around I left the white paper to do the brightest part of the image, fitting the yellow in as a glow between the brightest parts and the darkest shadows. Now it's finished I think I might buy some more of the water based printing inks and do some more. If you like it you can buy one in my ETSY shop.

I am very fortunate as I was able to swap a print with Gerry Turley, who was at the retreat, for one of his fantastic screenprints of a curled up fox. We now have our own little curled up 'fox' (Franki the Shetland Sheepdog) so the print means a great deal to me. You can see more of Gerry's work HERE.


 Spot the difference!

Wednesday, July 10, 2013

Picture Book retreat at Holland House


Last weekend I was very lucky to be away on the SCBWI Picture Book Writer's and Illustrator's retreat at Holland House, Cropthorne, nr Evensham. I drove Elsie the Morris Minor van 110 miles there and we had a lovely journey, once we got out of London! I did get lost at the other end, but that was my own fault for relying on technology instead of a good old-fashioned Map book. I also forgot to turn off the heater, which involves turning a small brass tap on the cylinder head, so it was rather like driving a wood-burner, but that's all part of the fun of the Morris.

Helen Stephens and Gerry Turley were speaking about their work, and we all really enjoyed reading our favourite books, and talking about the industry with editors from Hodder and Egmont.

It was great to actually spend some time thinking about all my random ideas, and deciding which ones might be suitable for the current market, and which ones are too away with the fairies! I spent an hour or so before I left adding post-it notes in all my sketchbooks so I could find the scattered remnants of rough drawings and texts for my ideas. On Saturday afternoon I managed to pull together one set of strands from these scattered fragments into a working storyboard for a picture book. It still needs a bit more work but I hope I will soon have it ready to send out on the hunt for a publisher.

View into the Rose Garden 

 I met lots of new people, and it was very good to be reminded that although we all spend our working time alone, with only the biscuit tin, fridge, radio and optional dog for company, there are lots of us out there all working away and trying to solve similar problems in our own individual ways. Getting together once in a while is very good for the soul.


Informal portfolio review on Sunday evening


 Helen's books and Gerry's prints for sale

Gerry ran a lino cut workshop on Saturday and Sunday and after a bit of dithering I remembered an image I'd had in the back of my head for months, of a daddy penguin making hand-shadows for his children at bedtime. It suited black and white well, so I decided to have a go at that. I'm rather pleased with how it came out, but I need to cut another block to add some yellow for the lamp light. When it's finished I'll print a small edition and put them in the shop for sale.

 When Bedtime Goes Wrong, Lino cut, 2013

Sunday, February 17, 2013

Princess Dolly in paperback-gift-box excitement!


My children's book Princess Dolly & the Secret Locket has been published in paperback form as part of a small compendium of books by Little Tiger Press. The other books in the set are Fairy Friends, The Princess' Secret Letters, Rosie's Special Surprise and At the End of the Rainbow. This is all very exciting! You can order a copy here...


My Pretty Bag of Books, published Little Tiger Press

Saturday, February 16, 2013

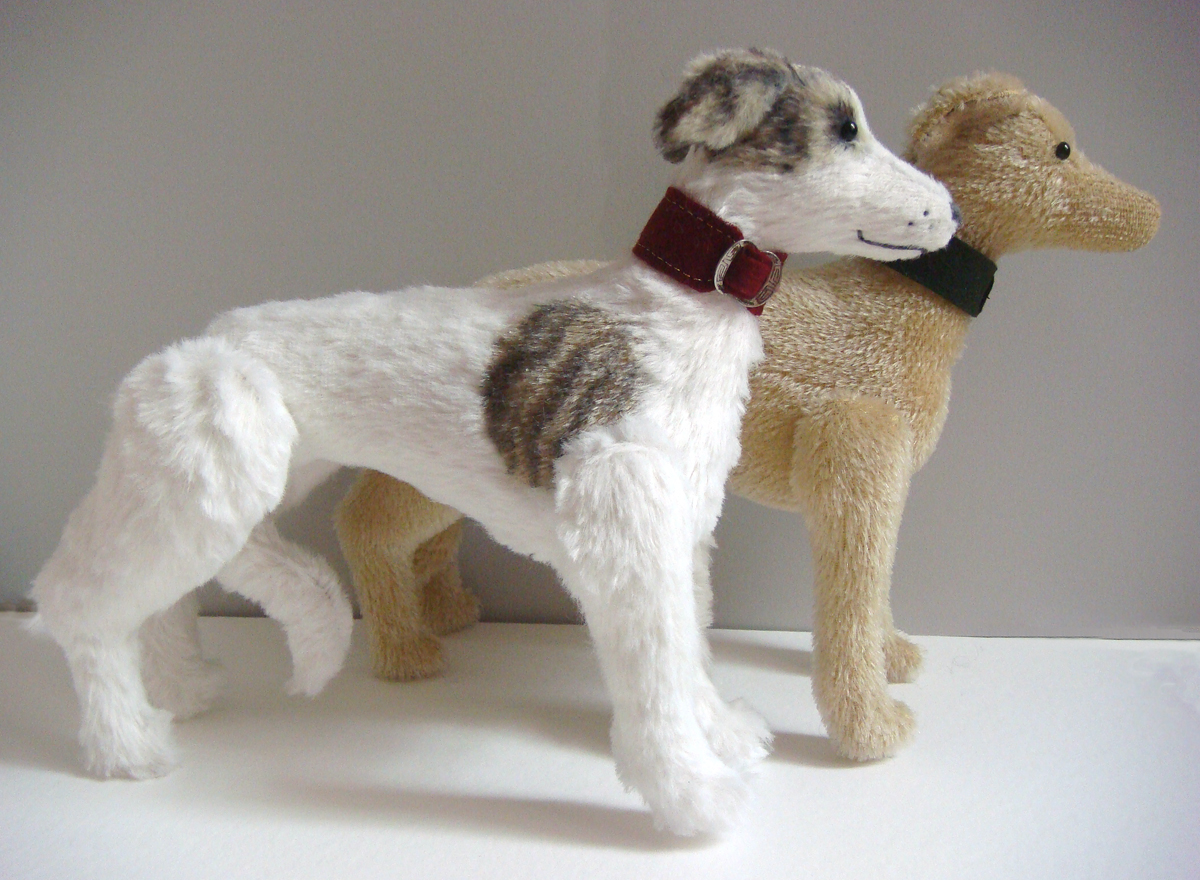
Whippet Toy Dog


I've been making a new dog pattern this month. I've wanted to make a whippet for a while but have been held back while looking for the right kind of fur. They are so sleek and smooth that even the shorter pile mohair is too tufty for them. I found this white velboa which has a woven backing and it's perfect. It takes colour well from fabric pens too so it's very suitable for the hand-drawn markings. The spots on the body are set-in by hand and cut from the 3mm mohair, shown here on the fawn dog in progress at the back. He has no nose at the moment (cue well known dog joke). The eye patches and ears are coloured with fabric pens. I'm quite pleased with how the ears came out. They need to be folded back against the head in a sleek streamlined way.

Whippet toy dogs, (fawn shown in progress).

I've had to change a few components too since making the earlier dogs. The quality of the plastic toy joints has gone downhill dramatically. I have heard that the tsunami in Japan destroyed the businesses which produced them and whole factories and production lines just disappeared. The joints I managed to source did not have washers, and had to be cleaned up and trimmed by hand with a craft knife as they were poorly cast. I've decided to swap to using the old fashioned cotter pin joints from now on. These are good as they are readily available in a wide range of sizes. I've had a similar problem with the black plastic eyes, so have changed those for the black glass eyes with metal loops on the back. These are better for creating expressions as you can recess the eyes by pulling the threads and securing them at the back of the head.
 
Whippet parts in progress showing set-in body patches.
Finished patch with brindle markings.
It's quite time-consuming sewing the smaller pieces in by hand, but impossible to do such fiddly things on a machine. I use my old Bernina record machine which is fantastic and it copes with most intricate work, but some pieces just have to be eased in stitch by stitch.


The collar is made of a dark red wool felt, with an old silver buckle which has been lurking in my button tin for years. I've embroidered gold thread around the edges by hand. I might add some more decoration before it's finished.


I'm planning on making the fawn dog brindled when I can pluck up the courage to set about him with the fabric pens. He also needs a nose and a decorative collar. These two have different tail positions. The white dog's tail is tucked between his legs while the brindle's is lifted a little. Whippets generally tuck their tails in, but I think the pattern looks better if it's held out a bit.


Update: I finished the fawn brindled dog. I gave him a silver and green collar with mother of pearl button.